4.0 Machine Quilting Experiment Number 1
January 26, 2010In my attempts to constantly say what an inspiration Leah Day is, I do have to say that this past weekend I started the beginning of what could be a very long year-long experiment in the scientific quilter household. Which is a good thing.

I started up my own 6 inch squares with dark fabric, light thread, batting, paper, a list of beginner designs by Leah that I printed off on my black-and-white printer, and my own variations of those designs. I do have to say that:
- I don’t own her DVD of designs – yet!
- I don’t own her worksheets
- I don’t get paid to say this
- I haven’t been asked to do this experiment
- I have not discussed this particular adventure in any way (yet) with Leah Day.
I simply LOVE the idea of learning how to machine quilt and I love how there is structure to the ‘unstructured’. The post where she set everything up is really what got me started thinking that I could do this too. Along with several other posts of hers as well.
Here’s my process:
- Cut out 6 inch squares of dark fabric and batting
- Search Leah Day’s Free Motion Filler Designs blog for the Beginner designs.
- Copy each image to my computer for reference ONLY (sorry if the next few steps break copyright)
- Save them in a folder on my computer with nothing else in it.
- View the folder as thumbnails.
- Take a screenshot of the thumbnails on my computer.
- Save the screenshot in photo editing software.
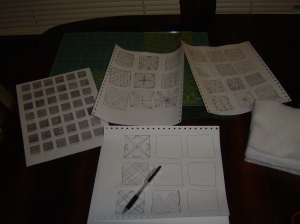
- Print the tiny thumbnails onto a hard-to-read black and white paper to give me some starting points on ideas (boy do I need the actual designs to do this better).
- Take pieces of scratch paper.
- Draw 9 boxes on the scratch paper.
- Try to “recreate” or “reinterpret” the designs (that I could see well) on the scratch paper, drawing in one continuous line as with her designs.
- Start to draw a couple of my own that I would like to try.
- Give up on any squiggly line type designs Like Oil Slick because I can’t do the curves right on the paper yet to my satisfaction.
- Draw a 4 inch line on each fabric top with marking pencil.
- Spray baste batting, backing and top together.
- Change the foot on my machine to darning foot.
- Thread machine with light thread etc.
- Put on my new machine quilting gloves bought from Leah’s site.
- Draw a box with the darning foot.
- Slowly and steadily worked around two designs.
- Realize I should have also bought cheater needles to hide the threads.
- Realize I should also have broken my foot as she suggested, but was not going to cut through plastic that easily without a replacement foot.
- Now I need to cut the designs down and put them in my clear plastic sleeves into my folder.

This was my sketching the designs to my liking and practice with one long pen stroke.

Loading my “quality machine” with the darning foot – see gloves on the side!

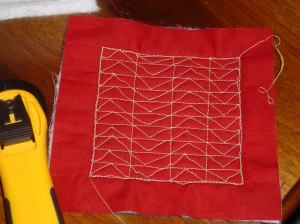
This was the first design and I listened to her video suggestion on this one and just did a grid and then the flying geese pattern. I like them up and then down without the bars in between.

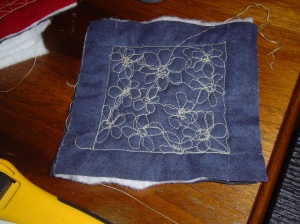
I have a love affair with daisies and instead of making them in rows like her Dresden daisies, I thought I’d rather see them in random patches. Not my best work, but these are interpretations of daisies. It’s a process.
So far practiced curves and straight lines. Boy was this fun and getting me excited to try more!
D–
I love your podcast and your blog. Anyone who uses Worddle is can’t be wrong…I’m addicted to worddle….am I spelling that right? Anyhoo! Thanks for all of your technical advice with my podcast. I am committed to getting all of that worked out this weekend. I am already ready to record another. Any advice on how I can get some intro music? And when I say advice I mean clear, concise, step-by-step instructions….ha! Keep on sewing girl! I love your designs…I love the daisies!
Hey Toni, nice job on your first episode. I sent you an e-mail already and I have a blog post almost ready to go for the mevio and audacity tutorial. Thanks for listening and commenting Toni and thanks for “jumping in to the ring”. If you need any more help, let me know, but be warned, even though I do step-by-step sometimes I do things the hard way anyway.
I had the wrong link up on one of my wordle posts. Goodness me. I found another new site to share for the next one – hope I get the right link up. I already sent you an e-mail and set up a blog post on how to add music to a podcast. Questions just ask. Keep it up Toni!
Darla, you are a fellow geek. I’m looking at all your squares and your numbered steps—love it! It’s kind’a like finding a new author, and having to read all her/his books in consequitive order, which I actually did with some quilt teachers’ books. Okay, now I am inspired to actually do this machine quilting workshop—keep up the podcasting/blogging. We all need inspiration to move in new directions (or cranial hemispheres), jill
Thanks Jill. I have to admit that I am not as inspired as I was the weekend when I set it up, but that will come back soon enough when I sit back down to it. There are a lot of different writing styles out there and my posts go really long even though they are numbered and lists. I am glad you’re enjoying things so far. More to come!
Did I reply to this Jill? Thanks for the encouragement. I love finding new authors too – many different styles. Although I gave up finding actual ‘book authors’ and now read blog authors more than anything. Thanks for the enouragement and you should post if you get some designs done. I’ve done a few more but not that many.
[…] my Machine experiment number 1 post for more details of my personal design experiment inspired by Leah Day’s […]