Archive for the ‘Conclusion’ Category

h1

37.1 Not Exactly as I Expected

March 17, 2015

I am an admitted perfectionist.

So, I have a hard time resetting my mind to “growth mindset” when I do something that doesn’t quite work as well as I would like.

And yes, I realize I should not like this trait. I don’t always.

But it explains why I am slightly disappointed in the results after firing my glazed pots from a couple of weeks ago.

I know now why not many pots start off with the dark colors as the base, it’s hard to tell if the glaze is done “thick enough” to be dark.

Some areas of these pieces I did well, but mostly I am disappointed with the coverage of my coating.

Which the lady at the shop told me would happen.

Anyway, here is my plate after glazing & firing.

dahlia plate after glazing

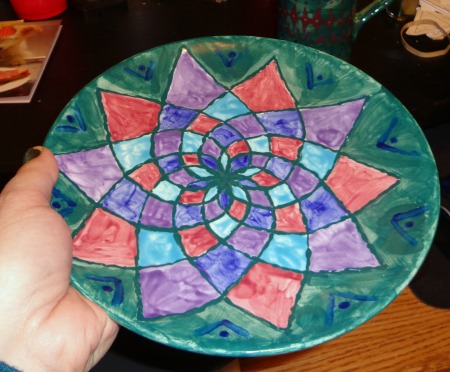
It’s not so bad, but just not exactly as I expected or pictured in my mind. I did the design great. But I did not do the coverage of the glaze great.

That’s okay, I can use this plate & be reasonably happy with it.

The mug I am less happy with, I should have stopped at one item that day.

Here is the flower side:

glazed mug flower side

And here is the border side:

glazed mug border side

Learning experience, yes I know. And now I can have a flower vase for the next time I ever have flowers.

I think the dark just doesn’t work quite as well because it’s so hard to tell if you have a good coating.

Actually I could tell I was getting tired of sitting there, and wanting to go while I was painting the mug. The wide brush strokes I was doing on the mug and the warning that using a little goes a long way I convinced myself at the time it was fine.

The right thing to do to keep on painting until I also got the mug done.

Actually, the right thing to do would have been to plan the mug better and go back another time.

Luckily, it’s not all that expensive, it’s just a tiny bit challenging to get off work, get all my food stuff done and then drive there to go out & paint.

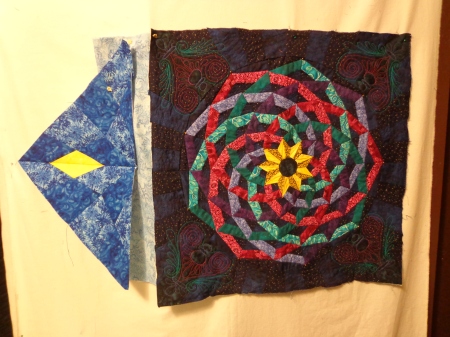
But I still have the dream of the red & black mug that matches my King’s Puzzle quilt.

So I will plan to go & do that sometime.

My 15 minute a day March-A-Long challenge isn’t going quite as well either, but I have been working on hand applique about 5 minutes every day. And I cleaned up some stray fabric I had out & about in my sewing room that was starting to drive me nuts.

How’s your month? Better?


h1

36.9 Weave On took over March-A-Long

March 10, 2015

I am not certain how or why, but possibly when I was doing the ceramics last week on my day off, I woke up the following day with a solution to a 4 year old problem. Well probably a 2 year old quilting problem.

weave border top completed with weaved borders

Four years ago, I, on a whim, made a quilt with 3 main colors, blue, red & yellow. I improvised a pattern that I saw online, but I couldn’t have told you who or what then, all I know is I made what I called a Weave quilt.

Then I came up with a variation on borders that I have seen several places that involved paper piecing & bias tape. I made lots of these border blocks using 3 fabrics for the borders that I also bought on a whim.

It turned out that I didn’t plan ahead on borders, I was originally when I bought the fabric, thinking I would do inner, middle & outer border in plain sizes.

This often happens, I was starting to run out of red fabric in the borders, but I wasn’t all the way around the whole quilt.

So then I decided to well, stop making the weave borders that I had planned & already started. And then I needed to come up with a clever end to this pattern, this quilt.

That was 2 years ago. I am certain I talked of this quilt before on this blog before at least once or twice.

Any event, the ephiphany happened and now I suddenly gotten taken over by this quilt, a desire to finish it before guild (tonight) pushed aside plans on both Sunday and today (my day off this week instead of Saturday).

It still took a good chunk of time on Sunday, and I did some unsewing of blocks once I figured on size, and measuring, and drawing what to do both on paper & EQ7.

weaved ends close up borders

I had figured out the two corner blocks a while ago, but hadn’t made them.

connected corner on border

The ends are little applique circles of the fabric I had stored with this quilt.

Circular ends

The biggest compromise I had to make with myself is not floating the border in blue fabric. I still wish I could have done it that way, but I completely didn’t have enough of the same blue, and I do like that the red just trounces off the edge of the quilt while the yellow stays connected.

Wow it feels great to get this done. My March-A-Long which I was only going to work for 15 minutes turned out to be another full weekend of mostly quilting. That is both good and bad.

I could feel an urge to get this done before the guild, to finish it off before my mind was tired of working on it. It really only needed the bordered finished and then attached.

More borders, who would have thought? I wonder if any more quilts only need borders on them? I could get a lot of these UFO’s to the next stages.

h1

35.7 Dancing Ribbons corner quilting not turning out

June 24, 2014

Okay I have been living with some darker fabrics next to my dancing ribbons quilt, trying to make the fabric decisions on what will work best for the corner blocks.

dancing ribbon fabric choices 2

And then on a whim this past weekend, I decided to start cutting up and using an even lighter fabric for the corner fabric, making my lightest color fabric on the left in my picture above now become the darker of the 2 blue fabrics.

Then I have everything cut out, and all my sets of pieces cut out, sewn together & trimmed.

dancing ribbons corner blocks trimmed up ready to piece.

This means all the paper pieces are trimmed and all the fabric is sewn together in groups of 2 trimmed.

But you know the old saying “Measure twice, cut once”? Yeah, I don’t think I did that.

dancing ribbons first too small corner

See how much smaller my completed corner is from the size of the quilt? I forgot to double check my measurement of my quilt block before printing out the EQ7 paper piecing.

I had put in the center block to being 20 inches instead of the 23 inch finished size. I was hoping to go large and then cut back, not the other way around. 😦

Sad trombone.

Also, seeing exactly how bright I went with the brighter fabric now this “way lighter” corner thing looks really out of place.

If I manipulate the one corner I have done in photoshop to see the quilt as it may appear (with the too small corners) it will look kinda like this.

dancing ribbons first too small corner copy

I don’t mind lighter corners, but this seems too light. I think I may rethink this redesign. I may go with the original darker fabric to tie it better to the original colors. I was “this close” to using the darker fabrics Saturday, but then “on a whim” (which sometimes works) I said that I liked this lighter fabric too much and I wanted to use it.

Since I have to redo the corners anyway for being too small, I will switch back to the darker fabric & purchase more of the ‘medium’ I have in this piece.

The dark from the corners of this piece will become the light in the next part of the fabric. The time I spent working on this quilt, there were limited hours for in-person fabric shopping. So this quilt will sit another week during the thinking stage.

The yellow bright corners may be too bright for this quilt, I have a duller version of the yellow. Possibly, I am going to rethink the actual corner colors.

I did have a thought about adding borders to the corners to make them fit better, but I don’t really want to try to mess with that.

I don’t mind too much about this setback. I DO really like the four corner colors that I have created.

So much that I decided to complete the four corners as a small quilt of its own. With a minor change with the inner star which I will highlight with the quilting stage.

blue faded star four corners

This is a cute little happy blue quilt. I will have a quilt plus the reverse of the same thing in the corners of the Dancing Ribbons quilt. With different colors.

Just not destined for this quilt at this time. Very pretty!

h1

17.0 Meet my Quilts

July 6, 2011

The following quilts are going into the show this weekend titled with the following names:

Quilt #1:

Challenged by Yellow

28 X 14

I found Judy L’s (Patchwork Times online) monochromatic challenge for the month of January intriguing – Yellow!  Yellow!  Who makes a full yellow quilt?

Challenge is on!

Using Bonnie Hunters (Quiltville) Strip Twist pattern as inspiration, I made the 2 blocks (limited in size by my lack of yellow fabrics) and then found a black and yellow butterfly on my calendar, so I traced and appliqued it onto the top.

Quilt #2:

Make it Sew

6 X 17 X 12

I was inspired to make the style of cover by flossie blossom (on flickr) but wanted a machine cover that had the words “make it sew”.  Make it sew is a play on Start Terk Next Generation Captain Piccard’s famous line “Make it so”  So I added the Star Trek emblem to the front.

I had wanted to complete a spectrum quilt, and on Star Trek they refer to ‘dilithium’ a lot, so the embroidery on the front and back is dilithium – 2 lithium spectra.

The hole in the back is perfect fit for my machine.

Quilt #3:

Homeless Escher Steps in 3D

18 X 16

Pattern from paperpieces.com

This is the first quitl I hand pieced which was a breeze.  1-2 sides a day every day after lunch, this took a while to piece, but I enjoyed doing it.

Pattern was absolutely perfect for my round table and then I got rid of the table 2 months after completing this quilt.

Named by blog readers.

Quilt #4:

Tilted Online Friendship (With Tribbles)

37 x 37

This was a swapped block from quilterscache.com as the first swap of a group of Quilting podcasters and listeners.  Sandi (Colwell) pieced the tilted 4 patch blocks and I sashed the blocks and added the applique which I designed.

This quilt is my first attempt at quilt-as-you-go technique which caused some issues.

The gold hexagons I call ‘tribbles’ because they were multiplying like crazy for another project.  Even they could not stay away from this quilt.

Quilt #5:

Sunflower Patio Dreams

37 X 39

The leaves and the flower petals were from a pattern called “Delightful Daisies” by Bee Creative Studio which I muiltiplied, created a bud that was opened.

I designed the two flowerpots myself, using one of my flower pots as inspiration.

The birds are from ‘Award Winning Applique Birds’ by Panela Humphries and I envisioned this (quilt scene) as if I was looking out the window on a patio.

After searching online the daisies I made were way more like sunflowers which caused some confusion for a while on the title.

Quilt Auction Quilt:

Tweeting in the Crimson Sunrise

21 x 21

Pattern from Quilters cache.com

Otherwise known as “Ouch this hurts my eyes”

****

Will try to get a podcast around the ‘behind the scenes of a quilt show” by podcasting a little each day the next few days.  The Quilt Show starts Friday at Eudora Middle School and goes through Saturday afternoon.

h1

13.4 Saturday on Tuesday

March 8, 2011

This week, like one of every 5 weeks, I have a saturday off on a tuesday.

It feels surreal and wonderful to go to work on monday – usually the busiest day of the week for my shift – and then automatically have the next day off.

And actually, I was ultra lucky because I preplanned for my quilt guild meeting tonight and took tomorrow off in advance too!

So ….

This all means that I have had time to complete things on my lists.

I really need to brush up on my handwriting.

We’ll see how the list thing goes.  In the past, I have written lists and it has paralyzed me.

But I have matured.  Maybe.


Sewing Day Report

This past Sunday, I saw this amazing book that my friend has a pattern in, which I’m going to have to pick up, there are lots of great small projects in this book.

The other friend who also works in the quilt shop was trying to get information about the quilt shop picking up the book, so maybe I’ll wait until I see it there and help a whole bunch of people out instead of just helping out Barnes and Noble or Amazon.

Or since the other friend works in the interlibrary loan department of her library, perhaps I should check it out instead.

I’ll give you more details as I know them.  Right now I have to go to the one blog to remember the title and stuff.

I always ask (and usually forget, so most likely re-ask) about the process of being a designer, how long it takes, how the contracts work, how/if the magazines or books retain the rights to the pattern.

It’s been fascinating to learn.

The other friend who was at the table at the time is a tech editor for a book company, and there was talk about book ideas and copyright, corporate espionage (… well not exactly, but I threw that in to see if you’re paying attention) and all sorts of stuff about do you speak about a book project or not.

Just to make it clear, at this time, I have no intention of going down the book road … but I wouldn’t be opposed to going down a book road in a few years or so … if anything happens and I can actually create real life patterns for people that will sell.

First things first, build up my own skills, have a blast doing it, create good relationships between online and real-life people.  (You know what I mean)


At the sewing day I finished measuring and sewing the front on my tumbling block table runner.


Because of how I ignored the mitered corner trick, I introduced ‘pookers’ in the corners. I had just read a yahoo group explanation of how to handle this too … days before this was done. And the author of the group solution was sitting right across from me at the sewing day.

Frankly, I was more worried about measuring the length of the binding at the time, and truthfully, right now, pookers don’t bother me.  Next time, I’ll want to rip that out and redo it.  Probably.  Maybe.

If you’re wondering, I kept in the stitching I did at the retreat.  I mean, why was I worried about something that I cannot see well either due to my thread color matching awesomeness?

I have more stitching to share from today and from Sunday, but I’ll break it up so I can scoot to Quilt Guild.


h1

12.2 Velocity Results … Finally!

February 12, 2011

Thanks for all 5 of you that participated in

I learned a few things about myself when hosting this type of event, which I will share on the next podcast.

Here’s my bullet list of what I learned:

  • get a great giveaway item
  • show the item for the giveaway first to help with participation
  • don’t make a giveaway so complicated!
  • don’t make a giveaway a really long time frame
  • giveaways that seem complicated just get put off until later … and later …
  • give a hard and fast deadline to when the results will be given – no excuses
  • set a timer to help you get past the fact that figuring out the results may seem hard (even though it’s not)
  • once you get past the initial inertia of figuring out results, it is NEVER as hard as you think
  • you forgot how much joy you have in creating the giveaway to begin with if you never work on it!
  • dimensional analysis will get you through times when you haven’t done the math right

… You want actual results?

How fast do we sew?  Really?

Here’s a copy of the pdf of the google document that I created.

velocityexperiment-2

Here’s the picture (for those who don’t have pdf readers handy):

This is not meant to be a display on who can sew fastest when, so I blurred the names here, except mine.

The highlighted column ends up being the speed in yards / minute as I have calculated.  I hope I got all the kinks worked out on the yards / minute calculation.

(note: there are 3 feet in a yard, 12 inches in a foot, and 60 seconds in a minute, and forgetting one or all of these facts can cause you to go crazy for about a half hour)

Actual conclusions (to the data, not to how I mishandled the giveaway and experimental results).

  • Two quilters sewed faster when sewing full length strips rather than sewing blocks.
  • One quilter sewed faster when chain piecing blocks than sewing full length strips
  • MY speed was the slowest of them all when it came to sewing blocks.  And right now I can’t remember if I actually sewed two pieces of 2 and a half width blocks instead of one piece.  If I sewed a length of 5 inches instead of 2.5 then my speed would be much closer to the speed of sewing everything else.
  • Sometimes cats, ironing, threadies under the fabric get in the way and slow us down.
  • The width of the strips DOES matter on speed.  The narrow 1.5 inch strips are slower on all quilters who attempted them, and the fastest speed is on 8.5 inch blocks.
  • Some people get in a rush when trying to time themselves and cause themselves more trouble than they would otherwise.
  • The average speed of all the results is 1.36 yards / minute.  We can sew just about 1 and 1 third yards of fabric in a minute’s time.  And do it accurately.
  • Some people don’t like timing themselves, but everyone who did, I am truly grateful
  • I have a timer on my iPod Nano that I didn’t know I had

Feel free to continue to participate and now that I have the database set up better, I can hopefully reply much faster (get it – faster?) with the velocity.

Giveaway

For the giveaway, I assigned each trial that people timed a separate # and then used the random number generator to determine the winner of the giveaway.

And the winner is:

Janet!

Sending you an e-mail Janet, hope to get in contact with you soon!

h1

10.9 The left brained swap results

January 11, 2011

I have to say kudos, kudos to my swap partner for the quiltcast supergroup tilted four patch block swap.  Actually, kudos to both of them, the one who made me my blocks, and the one who received my blocks.

This was for the innaugrial Quiltcast Supergroup block swap.

Block swapped:  Tilted 4 patch

Template and instructions found on Quilter’s Cache

Swapped with SwapBot, hosted by Katie (Quilted Magnolia in Big Tent)

Most of the other swappers were done some time in november, but the swap deadline was January 8th, so realistically I had plenty of time before I was late. 

But me being me, seeing other people complete their swapping projects, made me feel under the gun, behind, a little slow.

… And there is this whole ‘left brained quilter thing’.

You see, I had read somewhere that to control the bias of a tilted block, that you can mount a template on with freezer paper.

So I copied and cutout 4 x 4 triangle templates.

And then proceeded to iron them onto the BACK of the fabric.

Which this is leftover fabric for my hurricane top quilt.  I specifically chose this fabric first, thinking of all the colors I could draw from. for the 4 patch.

Actually these fabrics were laying out before I had my triangle templates, but you can see the fun I had here.  Many options for something else in the future!

Anyway, here’s a tip.  When you make freezer paper templates do one of two things! 

  1. iron freezer paper to the FRONT of the fabric
  2. reverse your teamplate before tracing it on freezer paper

I sewed my 4 patch together, matching them instead of actually going scrappy, using inspiration from the patches I received from Sandi.

See, the blocks are tilted to the right.  The four patch has leaned over to the right.

When you put the template on the back, the blocks, when sewn, lean to the left.

Left handed blocks from a left brained quilter.  And the other thing I wasn’t so proud of was my seam allowances. 

Yes, the seam allowances were great on my triangles, they had a template with quarter inch marked (because I wanted to torture myself), but the center of my 4 patch was not quite so nice. 

Too small seam allowance on the blocks = too large of inner block = points just matching up to the edges, but once these blocks are sewn together to something else, the points are toasted!

And I had a thought. 

Watching square in a square ruler video, I had an idea to use her method for the tilted 4 patch to make it easier!  And I could make these blocks tilt the ‘correct way’.

I had to use my current blocks to get the tilt.  Turns out these blocks are tilted 15 degrees instead of the more common 30 degrees. 

I could have also gotten the template out to figure out the tilt, but instead i used the block I already had done, but to work with it, I flipped it upside down.

The block in the back that is facing right side towards the camera has extra fabric around the outside in rectangles, which are easier to sew.

The block in the front is the block I was lining up to get the tilt correct!

Here is a picture of the completed block, ready to cut.  I had to line up my ruler straight on towards me and tilt the block behind it.

And then rip with the rotary cutter.

Square up, turn and repeat. For all 4 sides, for all 4 blocks.

Downside:  Now the bias is on the outside edge.  I hope this doesn’t create too much problem later on.  Starch it like crazy.

Or fuse the block with freezer paper for stabilization.

Moral of the story, check which direction you have the freezer paper, or you could be going backwards.  Or left tilted for the left brained quilter!

I made sure my partner got both sets of blocks, since one was backwards.  Anyway, this was fun.  On to the next swap!

h1

9.8 My ONE handmade Christmas Gift

December 26, 2010

I am now able to show my one and only handmade gift that I completed for christmas. 

First I asked the 12yo recipient if handmade was OK with her. 

Then I asked what colors.  Neon was the reply.

Then I asked if black was a good setting for neon.

Then I found the best bag pattern at the store and started making the purse.

For the retreat, I had packed some black and “neon fabric” and this pattern – the Fat Quarter Skrappysak and Friends bag.


 On the last early morning, I read through all the directions and started ironing and cutting out pattern pieces. Most of the pattern pieces were cut out at the retreat.

I had decided to embellish the pockets a little bit, using my tiniest bias tape maker.  I made bias in blue and pink. 

I also decided to add a colored circle on the tab.  To sew it down I made use of one of my decorative stitches.

Truthfully, it did take a lot of reading and rereading the directions.  I AM a slow figurer-outer and have only made the one totebag before.  Also this pattern is OLD and there was NO forum/online support.  The drawings were OK, but not fantastic. 

With perseverance, I was able to make the pattern as described (with only a few changes because of misunderstandings)

I had to take my pocket enclosure pieces and turn them inside out, which resulted in some interesting shaping. 

Getting the pockets on the bag was fun, and once I got started working on this project, I spent a good portion of one day on it.

The bottom was a circle, which you had to fold darts into the bag – FIRST time darting!  Whoo hoo!

But it wasn’t bad with a LOT of pins.

And then you do it twice, once to the lining and once to the outer bag, so I could remember how to do it now if I wanted to. 

The bag sat for a while in this state on my desk.

Little tip, if you want to upsize or downsize your pattern, sometimes you can scan your fabric into an all-in-one printer and hit copy at a larger or smaller size.  This is how I made the decorative circle on the tab enclosure. (seen on the left of the photo near the speaker)

At my friend’s house I was trying to figure what they meant by turning in a quarter inch of the bag handle.  I misinterpreted this to be the face of the bag, but it really meant the very tips.

Anyway, I figured out a solution.  And my friend lent me some neon buttons for embellishments!

While at my friend’s house, I figured out that the tab I put on the front pocket was meant for the top of the bag.  So I had to come up with an extra tab and velcro it on. 

Even the inside has pockets. (and neon green)

At christmas, the 12yo liked the gift, but the one thing I regret is that my only black velcro at the time I was working on the outside tab was sticky velcro.  And with a piece that big it was starting to come off. 

I meant to fix it, but putting a needle and thread through sticky back velcro is not advised. Ask me how I know.

There were a lot of happy tears during christmas.  This bag wasn’t one of the items to draw any tears of joy.  The strangest thing was that a used item from craigslist was the one that everyone was amazed by.  And it was a good, thoughtful, and useful gift. 

The Jedi master gives his glowing head approval of the television upgrade.  


Santa and Mrs. Claus also think it was a very great holiday!

h1

8.1 Evolution of a Camera Bag

September 21, 2010

Welcome back to the home sewing front!

This weekend, after the podcast, I was so tempted to playing a video game – not related to the mario project. I started to, but then didn’t enjoy it, so I got out some of my sewing stuff. I had my personal September Sunday Sew-In in my office, which was fantastic!

Sunday my nagging “product quilting mind” started getting after me, prodding me to lunge after my UFOs.

Last June, of 2009, I created this monstrosity for a camera bag.

I wore it to the local quilt guild show (before I was a member) and I was proud of it, but yet despised it at the same time. 

I sorta showed it off, but I kept trying to get sympathy from others, wishing they were saying “It’s not that bad, really.”

Instead I kept getting suggestions on how to make it better.

Problems with the bag. 

  1. Camera is too loose in the bag. The bag is too big.
  2. Unattractive bare elastic.
  3. Liner showing through on the sides.
  4. The straps are not evenly sewed down.
  5. The strap is too long.
  6. The strap sticks out in between my fabric and my lining.
  7. The strap has unevenly sewed zig zag stitch along the sides in addition to the straight stitch which makes it look just silly.
  8. The fabric, which was meant to be ‘fun & hip’ was described as ‘gross psychedelic flowery junk’.

A few months ago (I think memorial day weekend?), I created this little sharp, modern, clean looking bag.

Which has no straps, but I didn’t have my camera at the time of creating it, and failed to figure about how wide my camera really is.  So when you go to close it, you get this following picture (taken w/ the phone camera – low quality)

As you may be able to tell, the lid does not stay closed.  I was going to use black velcro on this, but with it being so short, it wasn’t going to work at all.

What I ended up doing most of the time was putting the camera in this black bag and putting both the camera and the camera bag into the larger flower fabric camera bag because it had straps. 

This made no sense.  But I lived with it.

In August our quilt guild had a meeting, where the speaker was a local quilting teacher who helped us create a sewing carryall.  This used a different technique altogether with separate pockets instead of folding over one edge.

This really is a nice idea except you really don’t see the ‘fantastic fabric’ until you open it up.  This project was wonderful and if I didn’t have a clear plastic case (with a zipper) as a sewing carryall, I would really be loving and using this more. 

A few other issues.

  • You can’t see it, but the top two pockets are divided by three sewing lines.  This would be fine for the bottom pocket, but I should have only put the middle sewing line on the middle pocket.
  • The bottom pocket was too tall to handle anything small (needles, seam ripper, washable glue) well
  •  No batting or fleece in the middle and back pockets.

However, it sparked some ideas.  What if I put an accent fabric right on the edge of the pockets?  What if I varied the pocket size and colors a little bit more?  What if I gave my strap ide another chance?  A month ago I wrote down some of my ideas on how to make this carryall better.

And so this weekend, when I was looking wistfully at my original, unsatisfying camera bag, and then staring at my fabrics, I got out my seam ripper and was about to start ripping on the zig zag, but then decided to make something different instead. I started thinking about redoing the camera bag from scratch.

I melded the idea for the straps from the original camera bag, and the idea for taking a different fabric for the pockets from the sewing carryall, and my experience from making my tote bag, in addition to some blog post I saw about making a camera bag with a lens cap pocket, and created this on Sunday.

There is an extra pocket on the back (was intended for the front, but when turning the project inside out it ended up on the back and I am happy with it, so it’s staying on the back.

One more picture showing the lining fabric.

What’s cool and new about my new camera bag?

  • Cool, sleek, thin, good looking strap, with fusible fleece imbedded in the strap for weight.
  • Two pockets, one for the camera, one for 4 batteries.  Unfortunately, I need this because the rechargeable batteries I tend to use do lose charge easily.
  • Trim on the pockets of different fabrics.
  • Rings I cut off of a handbag I bought from goodwill last year.
  • The top ring serves no purpose in closing the bag, but it v heft enough to keep the bag closed on its own.
  • Tabs created for the ring tab are sewn into the bag itself.  Sleek.
  • Colors go well together.
  • My camera fits in it well!

This time, when I carry my camera bag, I hope to get some great comments about how good the bag looks and works.  Looking forward to showing it off at work too!

h1

4.1 SQ Podcast 9 – Keep Experimenting Everyone!

February 5, 2010

Podcast Feed

Cookie-Cutter Experiments vs Design your own

Already designed items are appealing due to overcoming obstacles in time, money, experience, fear, energy, motivation, or static friction.  Some examples of pre-designed experiments are:

  • cross stitch & embroidery patterns
  • knitting & crochet patterns
  • quilting kits
  • BOM’s
  • free motion stencils

The other choice is to design it yourself.  There is much fun in coming up with

  • quilt block patterns (see Tuxedo Designs blog)
  • quilt pattern placement or size (on point, baby sized, with sashing …)
  • hand drafting quilting patterns (see Leah Day Free motion quilting designs blog)
  • color choices
  • fabric types
  • thread choices
  • color values
  • rick rack choices
  • applique patterns

(see my Machine experiment number 1 post for more details of my personal design experiment inspired by Leah Day’s blog)

(also see Tuxedo Park Designs’ personal blog where he takes common blocks and experiments with color and placement and scale – good insight into the experimental design process)

As much fun as it is designing your own stuff, it is also fun to decide what materials and tools to use for your project.  For me, sometimes that takes the form of scientific experimentation. (or just experimenting – or just playing)

(A small number of) Ideas for quilt-related experiments in this fashion:

  • brand of quilting gloves
  • type of needle (sharps vs milners vs betweens ..)
  • thimbles (like in Quilter’s Home mag)
  • Machine quilting surfaces
  • types of material to quilt with (cotton, flannel, knits ….)
  • thread brands

Experimental Design

Going through an example, we can discuss the finer points of setting up good quilty experiments

Get your question figured out and focused

  • Lets say I want to know about thread – specifically thread durability while machine quilting

Come up with a hypothesis something I want to know

  • I think that different brands of thread affect quilt durability during machine quilted applications (this should probably be more specific still)

Figure out how do you measure if your hypothesis is true (finding out your manipulated variables)

  • Amount of time, stress, and washing affect quilt durability.
  • Any one of these three measurements can be used as their own separate experiment – remember to focus

How do you show that changes in your variables will result in changes to your quilts?

  • Mini Experiment 1:  Hang weights on a quilt that is machine quilted for 30 days.  Take observations daily of the quilt and compare results from day 1 to day 30 – extend this longer if necessary
  • Mini Experiment 2:  Hanging a quilt with a sleeve using different amounts of weight (different stresses on the quilts).  Take observations of how much weight is on the quilt when the quilt thread breaks or stretches. 
  • Mini Experiment 3:  Washing a quilt for 30 washes (decide if you want to use detergent or if you want to machine dry your quilt or you want to wash with rocks in your washing machine to help enhance the wear on it).  Take observations of your quilt after each wash (or 5) and compare results from no washes to 30 washes – extend to more washes if necessary

Notice that in:

  • Experiment 1 we are changing the number of days.  Days or time is our manipulated variable in this experiment.
  • Experiment 2 we are changing the stress on the quilt. (using weights)
  • Experiment 3 we are changing the amount of washing time.

All these experiments may tell you about the ‘durability’ of the thread types. 

You may find after this point that you want to only focus on one part of the experiment or you may want to be more specific still on your hypothesis. 

  • Maybe you only want to test the amount of wear on the quilt due to washing, and then decide to use different types of washing settings (hot water/cold water), detergents, dryer settings, amount of stress and other clothes in the washer at the same time …

Playing with Variables

DON’T make ALL the changes to your quilt simultaneously if you want to find out the real cause of your manipulated variable.

  • If you change the stress, washing, and days, you could have results, but what were the results actually from??

Keep everything else the same.   You don’t want to change anything that may throw off your results

  • Use the same fabrics/batting machine/ stitch length for each type of thread you’re testing …

This is the controlling variable idea of your experiment.  You can have a “control” with which to measure everything against. 

  • Your control in each of the experiments we have set up is the completed quilt on the first day with no weights or washes.  Find a way to make good observations of your control (take pictures, notes, feel for puckers) before you start. 

Always start with a ZERO result.  Sometimes you can make 2 duplicate copies and leave one alone and test the other to help with comparisons. 

  • Like they do on the washing detergent commercials, only have one quilt with zero washes and the other quilt with 20 washes or 30 washes

Set up a rubric so you can tell “what is better”.  This can be done mentally or you can give it a point value

  • Best score for the washing quilt experiment is that after repeated washes there are no frays, puckers, raveled edges.  Or you can do a pull test on the two fabrics and just pull them apart and see if they will pull apart easily.

Be prepared to make changes.  Successful experiments can, and should, be changed and restarted with different techniques once you have some experience under your belt.

  • Increase your amount of time, figure out a clever way to add stress without using weights. 
  • Then go back to the start and retake your data

Tips

Go small scale to figure out if you’re even in the ball park.  Mythbusters does this well.

Be prepared for a hypothesis to be disproven.   Try to get your data in an objective way without putting your “wishes into it”. 

For example maybe my friend sells these really awesome quilting gloves, and I wanted to prove they were better than other brands of gloves.  And it turns out that the friend’s brand stinks. 

As long as you don’t tell your friend that they stink – try to keep the emotion away from the testing.  Put your emotion into something more useful.  Like designing that award-winning quilt!

Some fun websites related to web 2.0

Searching Marion’s blog I found her useful sites and I would like to also borrow one of her useful sites off of this post:

Why didn’t I mention this in the podcast?  This is another Great site!

Make Blog led me to Indestructables DIY site for step by step tutorials

More fun

Just look at my wonderful acorn PRIZE from Mirkwood Designs for doing a podcast-inspired project!  So soft and look at the detail and quality of the card as well!

Her podcast number 4 details the soft block carving.  Here look at my stamp project


Here is my signature block with some (useless) walmart tools and the (useful) exacto knife.  Cost: $1 for eraser, $4 for walmart tools (not necessary), and $5 (I think) exacto knife – has lots of blade types

I drew with pencil onto paper, then rubbed the pencil eraser onto the soft block eraser

Carving the image is not hard at all, but you have to be VERY careful – sharps – and VERY patient.  Did this while watching ‘radio TV’.

The completed stamp and bits.

Additional Resources about the topic:

Thanks to my commenters:

Check out the posts from LabMom on

Space inspired quilt idea sites from Peggi

I am seeing a little bit of traffic from specific sites that put me on their blogroll.  Specifically the Triangle Modern Quilt Guild   Thanks!

Thanks guys and Keep experimenting!